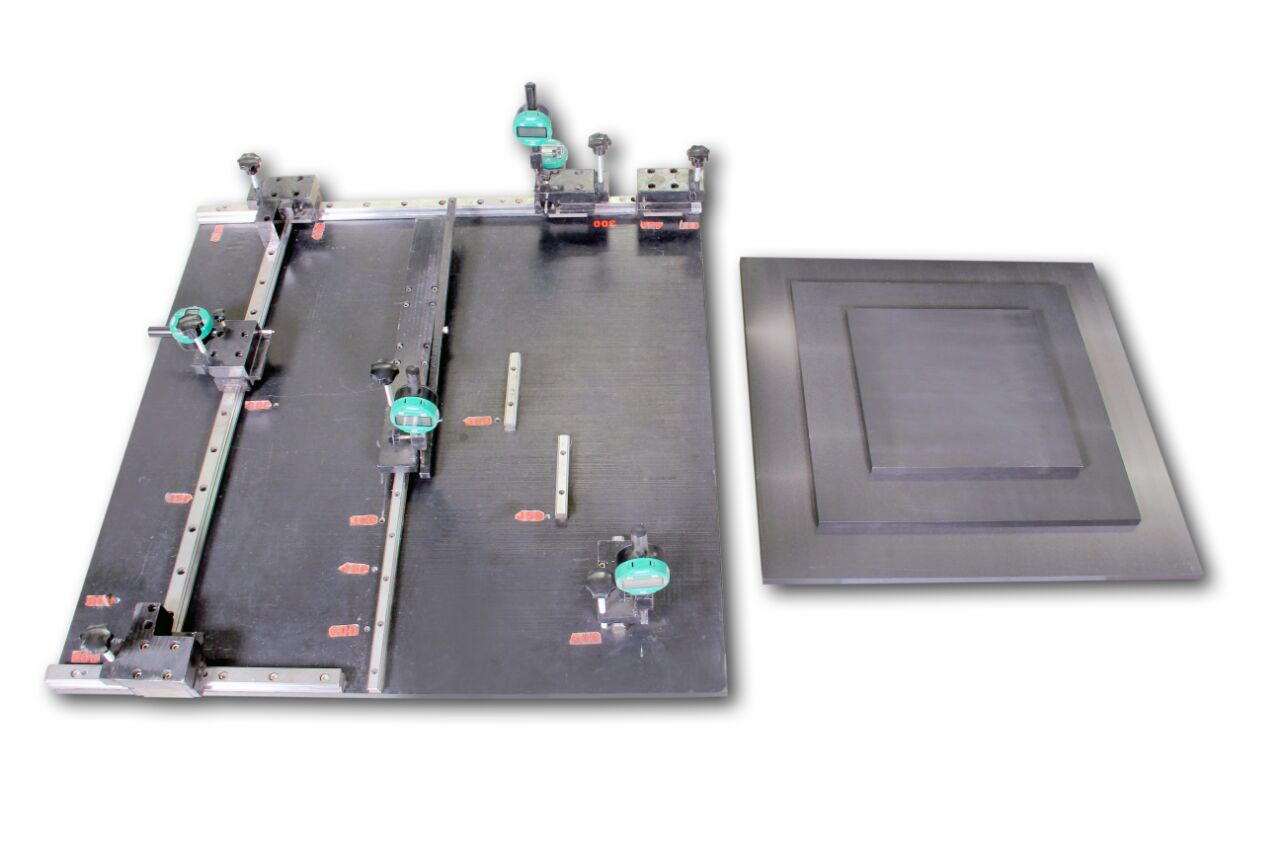
Complies with following International Standards:
IS : 13630 (Part 1), EN ISO : 10545 (Part 2)
Application :
- For measurement of straightness and squareness.
- For measurement of flatness / warp age
- Tiles size : 100 x 100mm to 600 x 600mm
- Material of Construction : Mild steel duly powder coated
Procedure for Measurement of Straightness of tiles:
- Apparatus should be such that, when a tile is placed in the apparatus, the locating studs are 5 mm from each corner of side being measured.
- Fit the appropriate calibrating plate exactly into the position into the instrument and adjust the dial gauge readings to a suitable known value.
- Remove the calibrating plate.
- Place the proper surface of the tile on the locating studs in the apparatus.
- Now, record the dial gauge readings in the centre of the side.
- Rotate the tile, if it is square, to obtain four different measurements.
- Repeat this procedure for each tile.
- The average value of the deviation is calculated for each tile as well as the average value of the average deviations of 10 tiles is also calculated.
Procedure for measurement of squareness:
- Apparatus should be such that, when a tile is placed in the apparatus, the locating studs are 5 mm from each corner of side adjacent to the side being measured.
- The plunger of the dial gauge (B) shall also be 5 mm from the corner of the tile on the side being measured.
- Fit the appropriate calibrating plate exactly into the position into the instrument and adjust the dial gauge readings to a suitable known value.
- Remove the calibrating plate.
- Place the proper surface of the tile on the locating studs in the apparatus.
- Now, record the dial gauge readings 5 mm from the corner.
- Rotate the tile, if it is square, to obtain four different measurements.
- Repeat this procedure for each tile.
- The average value of the deviation is calculated for each tile as well as the average value of the average deviations of 10 tiles is also calculated.
Procedure for measuring Surface Flatness:
- Select an apparatus of appropriate size and place the corresponding calibrating plate exactly into position on top of the three accurately positioned studs.
- The centre of each stud is 10 mm from the side of the tile and two outer dial gauges are 10 mm from the sides of the tile.
- Adjust the three dial gauges to suitable known value.
- Remove the calibrating plate.
- Place a tile on the apparatus with the glaze or proper surface downwards, and record the three dial gauge readings.
- Rotate the tile, if it is square, to obtain four different measurements.
- Repeat this procedure for each tile.
Following Accessories will be the part of standard apparatus:
1) Digital dial Gauge:
- Make : Insize or Equivalent make
- Range : 0 - 25 mm
- Accuracy : 0.01 mm (10 Microns)
- Quantity : 05 Nos.
2) Calibrating Plate:
- Made of Aluminum having accurate dimensions and with straight, flat sides.
- Following sizes of calibrating plates along with the Instrument will be provided.
- 450 mm x 450 mm
- 600 mm x 600 mm
Note:
At the time of placing order, please gives your tiles size which are continuously being measured.
Click here for working video : https://www.youtube.com/watch?v=AU2Qw9VrXeI
.png)
.jpg)



.png)






.png)

.png)

.jpg)


.png)
.png)

.png)
.png)
